Introduction
Warning: The Apocryph S3 aApp is beta software.
While this aApp might work for particular use cases, no features of it should be considered stable or final until a stable release rolls out. In particular, there may be security vulnerabilities within the aApp's code (which you can freely review) that will be fixed in future releases.
The Apocryph S3 aApp (autonomous application) allows you to store files in an S3-compatible filesystem backed by an attested trusted execution enclave.
This allows you to store files, application data, backups, and more, in a private and secure manner, where no one else can read them.
Features
- S3-compatible API: Courtesy of Minio, we support most S3 operations that modern applications require. Full list of available S3 features.
- Cryptocurrency-based payments: The aApp accepts payments in USDC on the BASE network, billed in 5 minute increments.
- Fully attested execution: The S3 aApp executes within an attested environment powered by the Apocryph aApp toolkit. You can verify the attested environment to confirm that no one can impersonate the S3 aApp.
- Open source code: The S3 aApp's repository is fully open-source, allowing anyone to review and trust the code that's running within the attested environment.
- Web interface for managing payments: Accessible at the Apocryph Console. See the usage documentation to learn how to use it.
- Web interface for managing stored files: Courtesy of Minio; can be accessed through the Apocryph Console.
Next steps
- Read more about how to attest the S3 aApp
- Learn how to use the S3 aApp
Using the aApp
To use the Apocryph S3 aApp, you can go to console.apocryph.io. There, you should be greeted by the Apocryph Console allowing you to configure payments for the Apocryph S3 aApp and get a link to login to the Minio Console or S3 API.
Step 1: Connect

The first step involves connecting your wallet to the aApp. Currently, the aApp frontend supports using Metamask to connect a wallet; Metamask in turn supports passphrase/private key wallets as well as a number of hardware wallets.
To proceed to the next step, you need to connect a wallet.
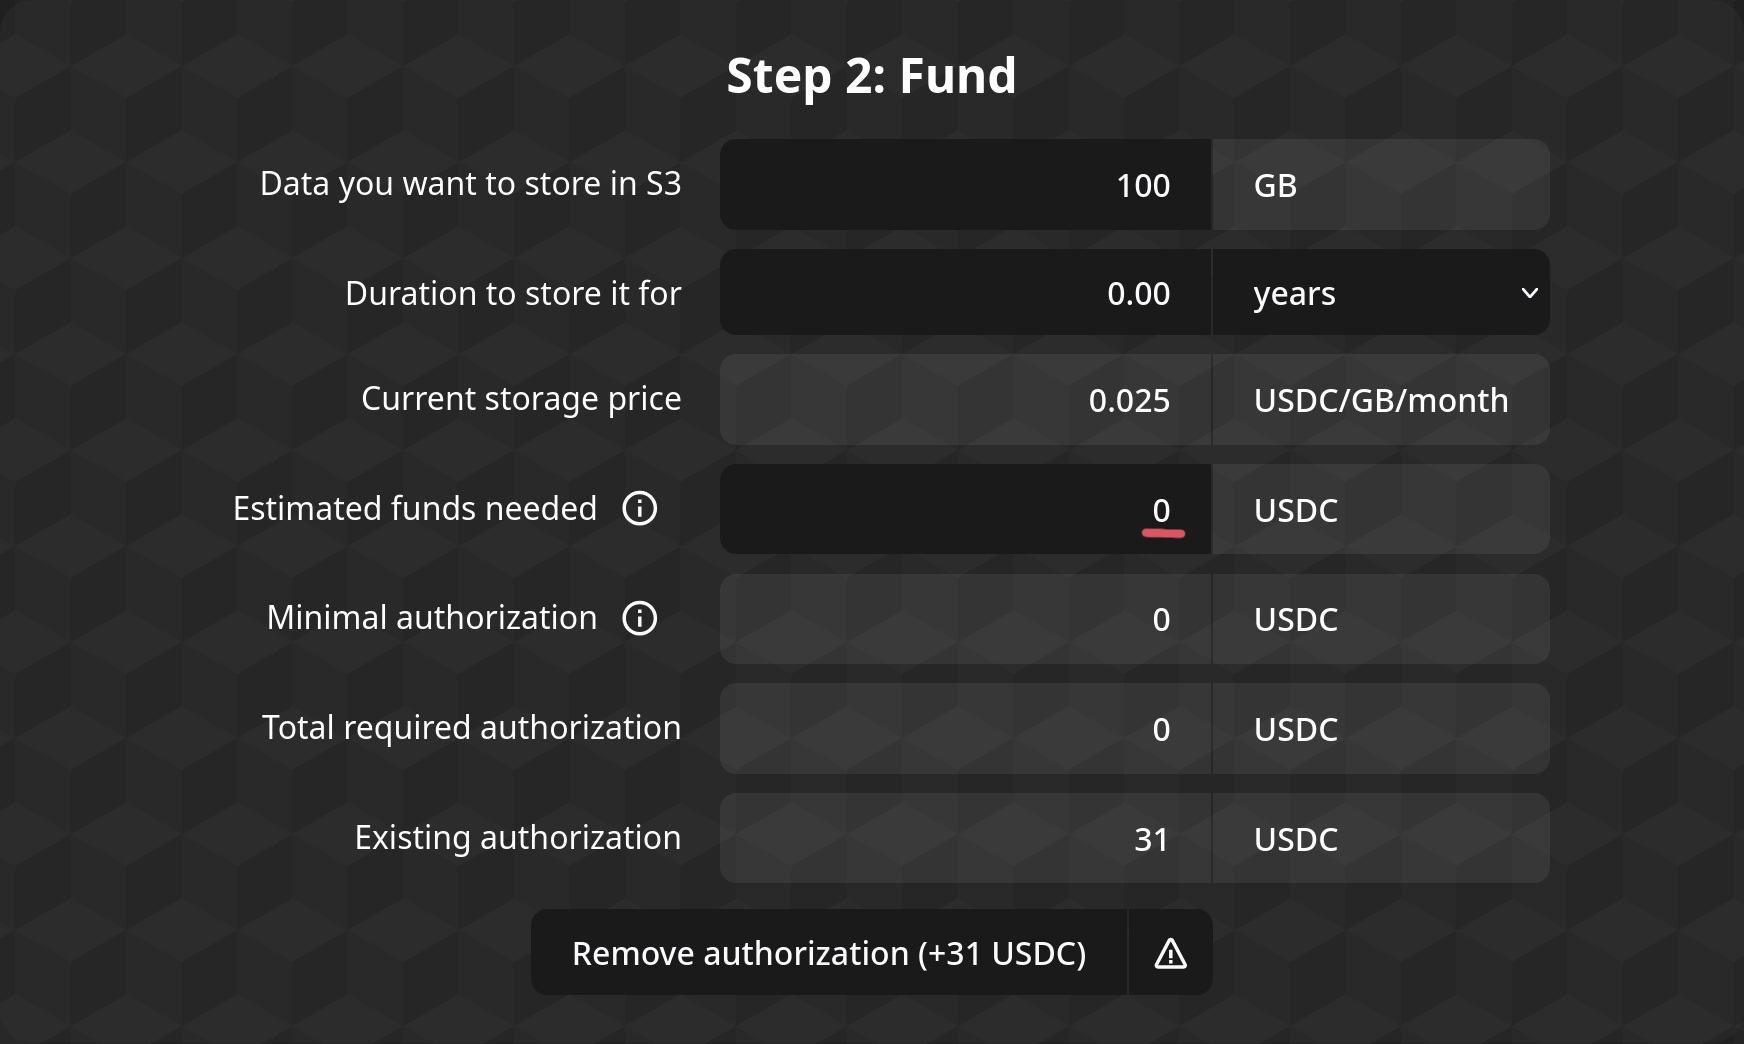
Step 2: Fund
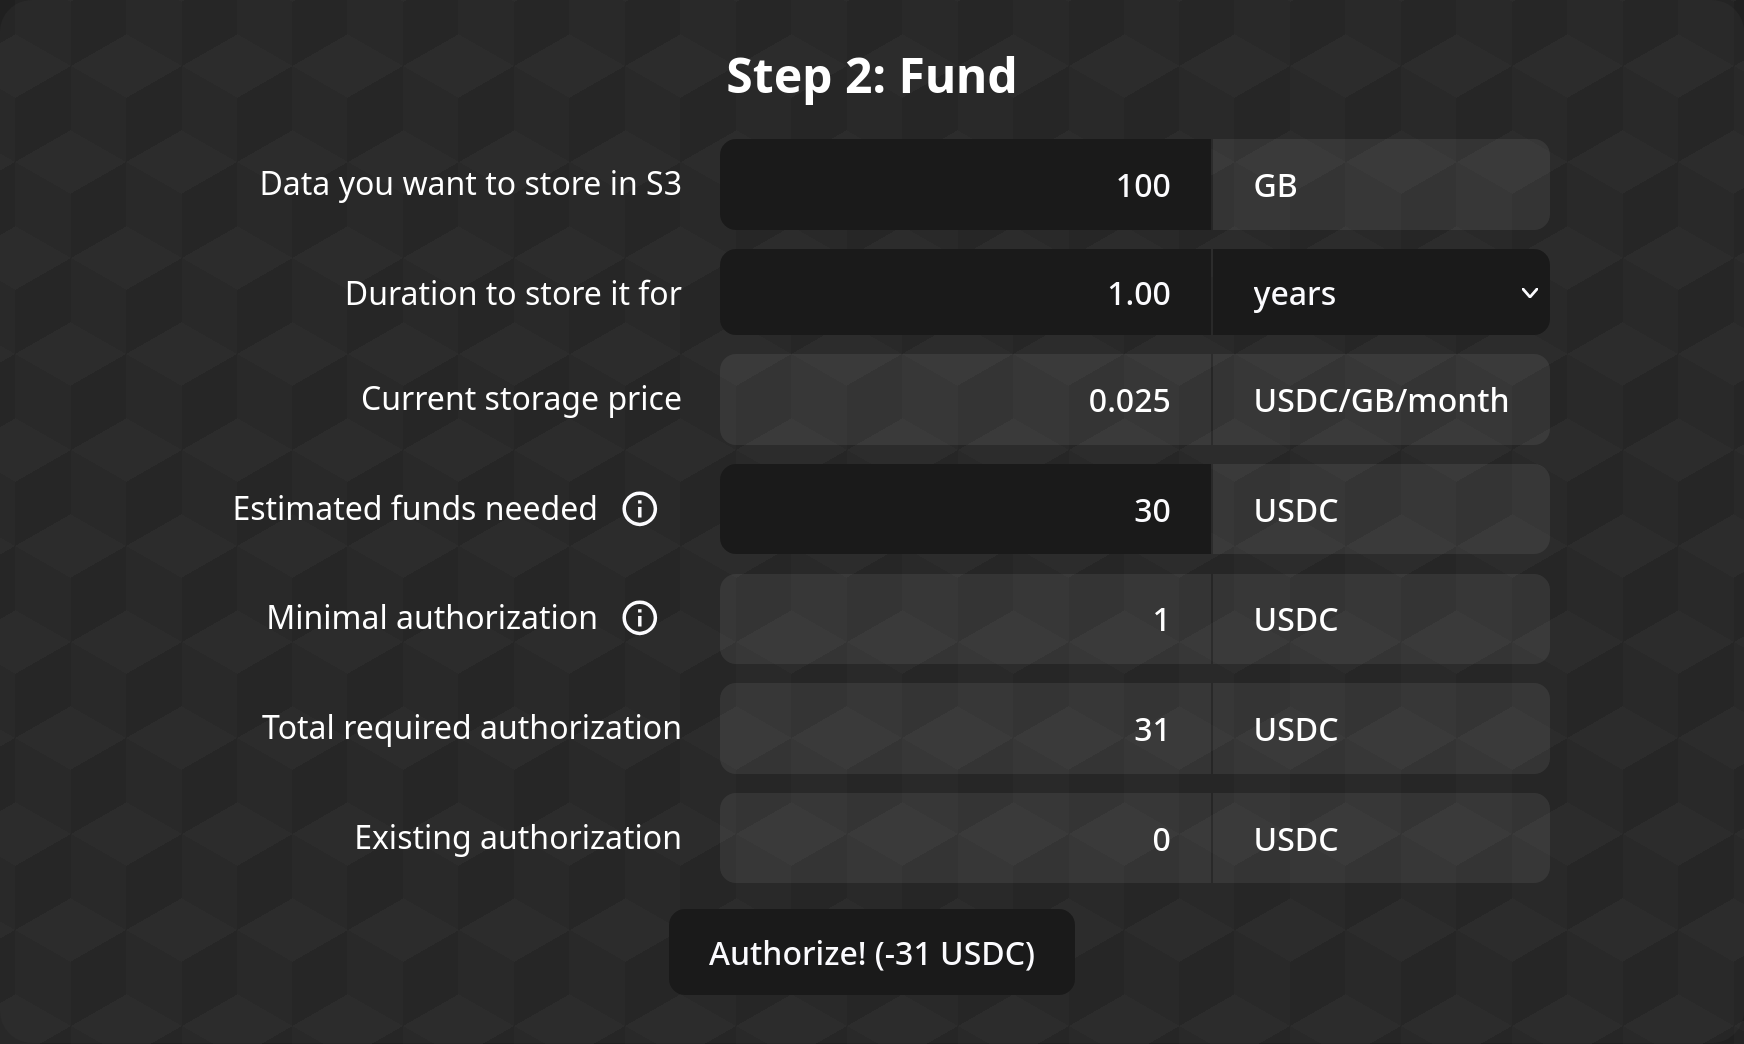
The second step is for authorizing the S3 aApp to access funds for the S3 storage space. The form displays the current price for storage deals (in USDC per GB-month), the currently-authorized amount, as well as fields for configuring the new authorization amount.
You can either input the amount of data (in GB) and duration (in days/years) you want to authorize funds for, using the first two fields, or you can directly use the fourth box ("Estimated funds needed") to input the amount of funds you want to allow the aApp to have access to.
The minimum required authorization box shows the amount of minimum authorization required for the aApp would allow you to login to S3; before proceeding, the form will automatically add that on top of the estimated funds needed for storing the data for the specified duration.
When you press the button at the bottom, the frontend would submit a transaction for adjusting the on-chain authorization so it matches the wanted authorization.
To proceed to the next step, you need to have authorized at least the minimum amount required. Note that dipping under the required minimum would result in no longer being able to access the aApp.
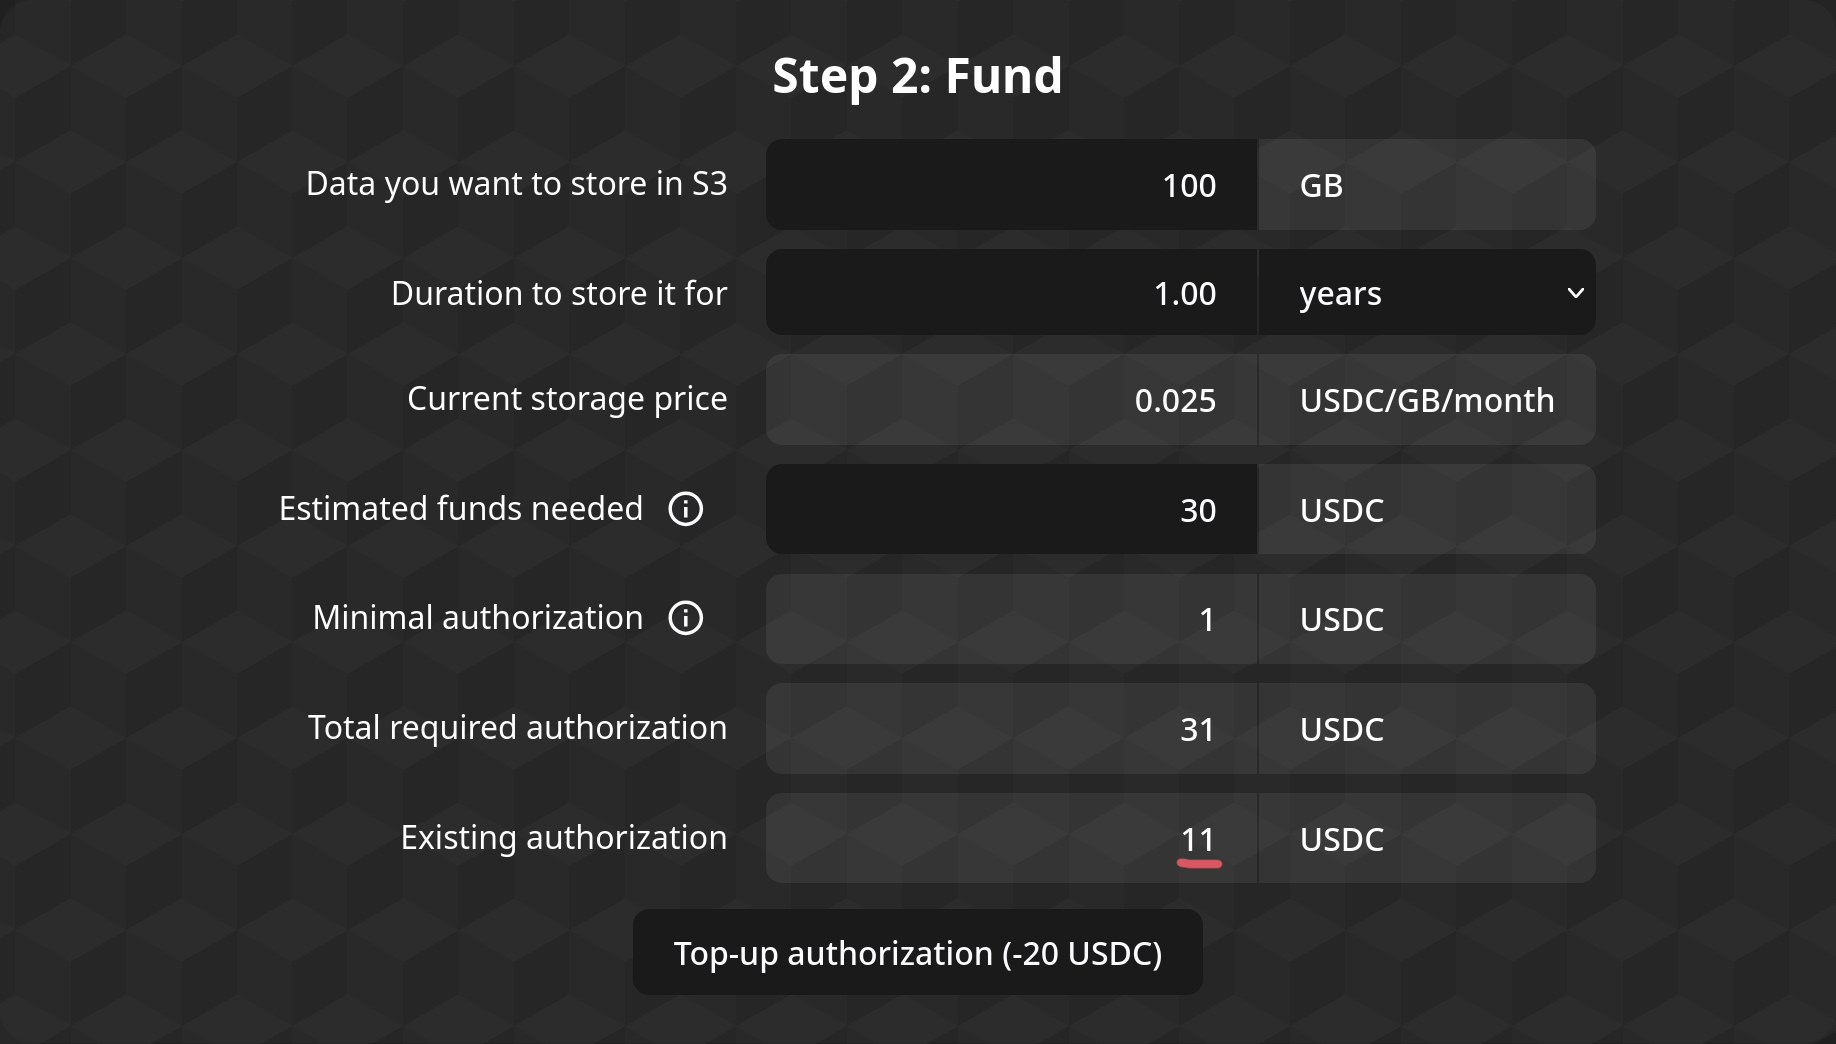
Topping-up
Once you start using the S3 aApp, it will start withdrawing from the funds you have authorized it to use.
If the authorized funds fall down to zero, the aApp may delete your data!
To avoid that, you should routinely top-up the authorized amount of funds using the Apocryph Console, using the same Step 2 interface, making sure it stays positive for as long as you want to keep your data stored.
Step 3: Access
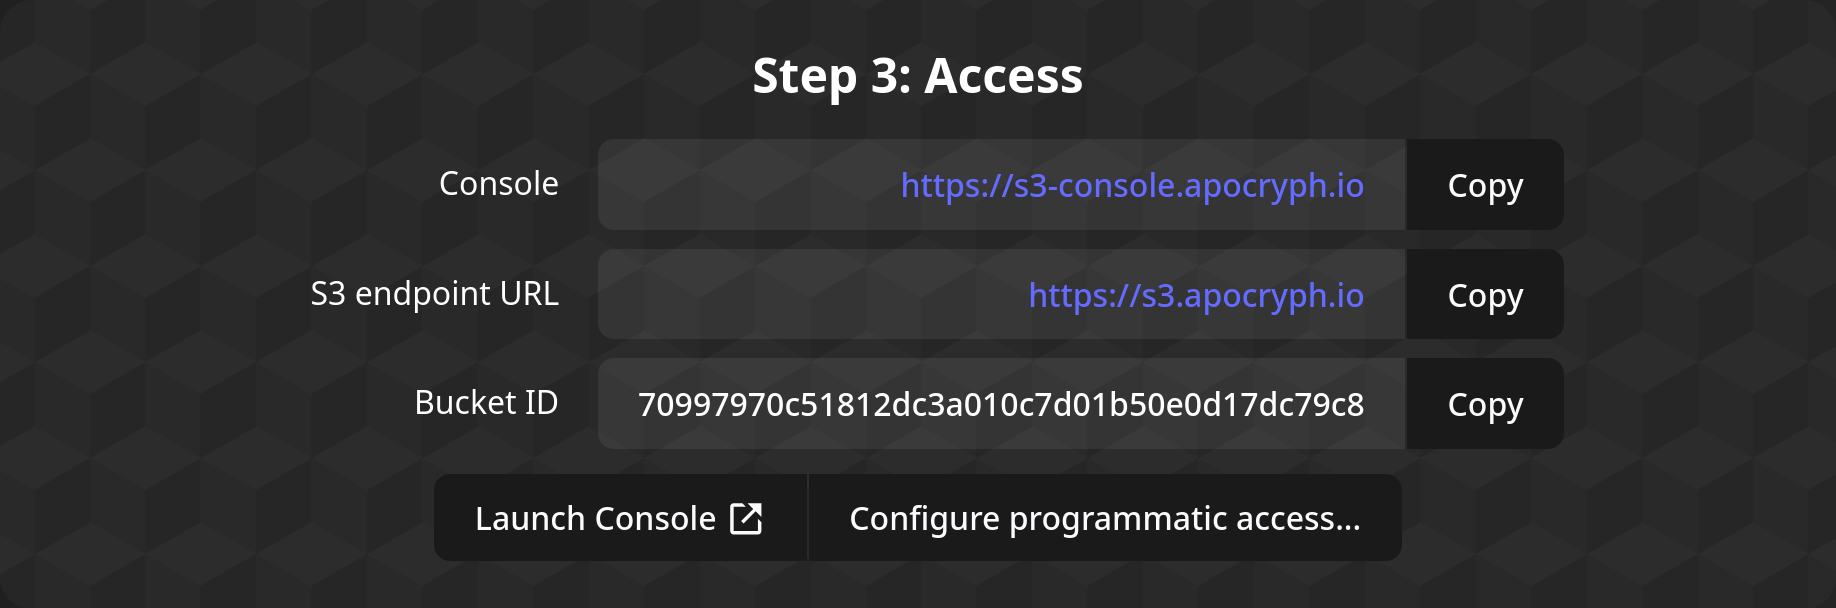
Congratulations! You now have an S3 aApp bucket!
To access your bucket, you can use the buttons in this step; one will launch the Minio interface, while the other will lead you to sample code for integrating the S3 aApp with your applications' code.
Web interface
To open the web Minio interface, you should click the "Launch Console" button. It will ask you to sign in with an Ethereum signature, after which it will open a new tab with the Minio Console. If the new tab does not open for any reason (e.g. a popup blocker), you can just click the button again.
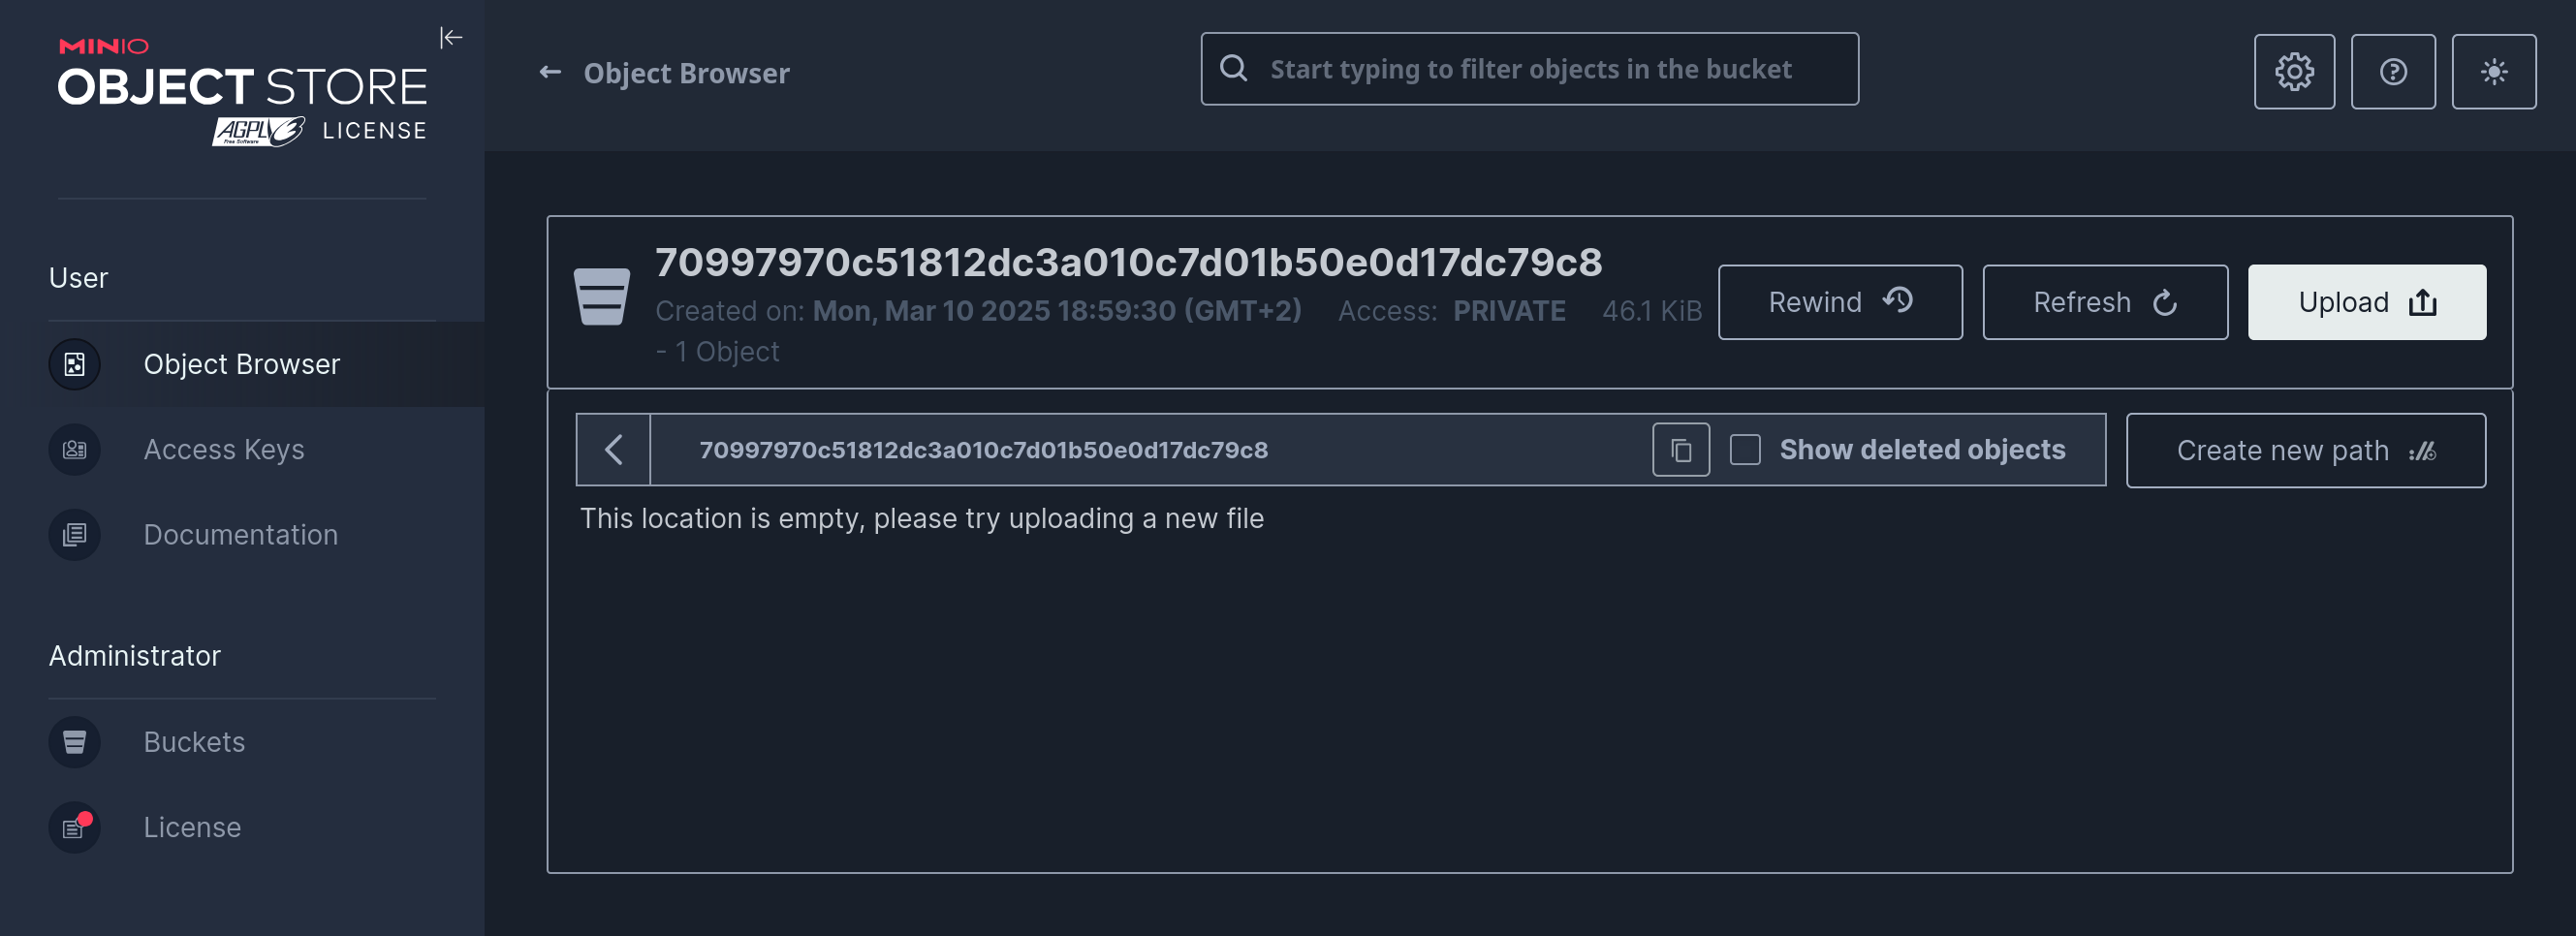
Within the Minio Console, you can upload new files using the "Upload" button, and you can configure Bucket policies (such as public access) using the cog wheel in the upper right.
In addition, you could configure Access Keys for programmatic access through the Console, but those will be lost whenever the S3 aApp undergoes its upgrade process. Therefore, you should not use Minio's Access Keys feature for programmatic access, but instead turn to the Programmatic Access option in the S3 aApp's interface.
Programmatic Access
To configure programmatic access to your bucket, you should use the "Configure Programmatic Access.." button. It will ask you to sign in with an Ethereum signature, after which it will open up the later steps of the .
To proceed to the next step, you need to sign in for programmatic access; though if you only want access to the web interface, you don't need to do that.
Step 4: Hack away!
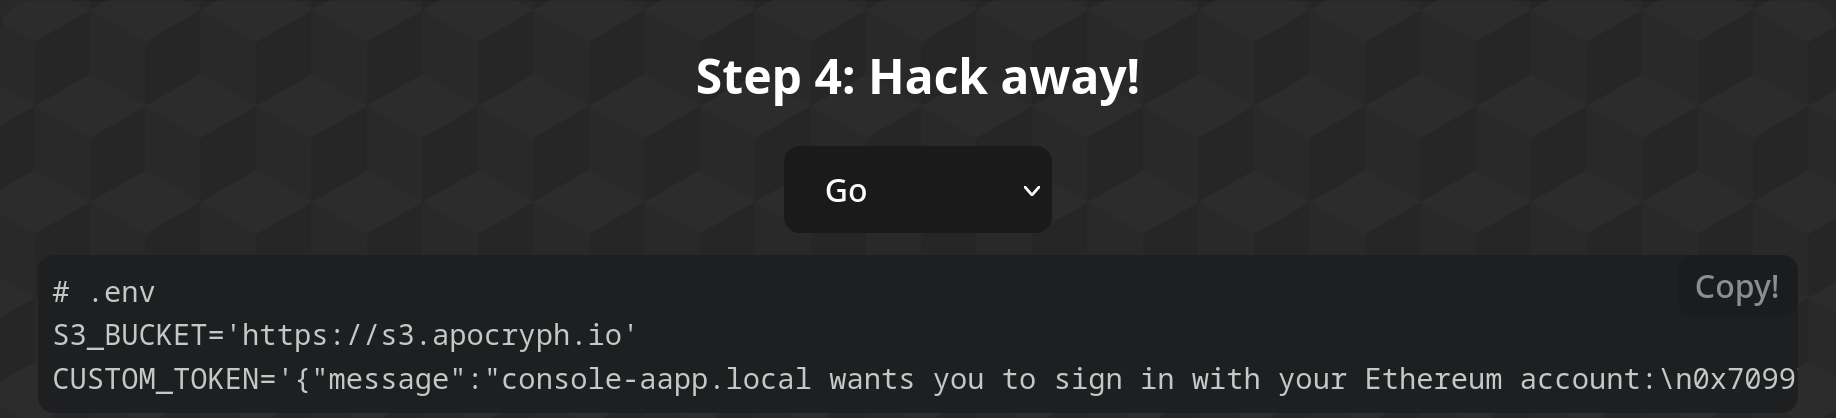
Step 4 provides you with sample code to access your bucket through the Minio SDK. A dropdown at the top allows you to pick your favorite language, while the two boxes below give you a .env file with the needed environment variables and a sample of code that uses it to connect to the bucket in the S3 aApp.
More languages / better language support and support for other S3 SDKs will come in the future.
Step 5: Profit!
Well, there you have it: your app is storing its files within a storage vault that no one else can access—not even us. Huzzah!
Cancellation
If you want to stop using the aApp, you can cancel your access to your S3 bucket by going back to Step 2 and setting the "Estimated funds needed" field to 0, then press the "Remove Authorization" button:
Note that removing your authorization will result in the eventual deletion of your stored data!
Further considerations
- Make sure you attest the S3 aApp before you start storing sensitive data in it.
Payment
When it's initially deployed, the aApp creates a new Ethereum wallet for itself and uses it to deploy a smart contract it uses to manage all payments. Crucially, the aApp is the only one able to use that Ethereum wallet, since it never shares it with anyone outside the TEE boundary - and by extension, it is the only one able to operate the payment smart contract.
Authorized funds
At all times, the aApp keeps track of your current USDC balance and your current USDC spending cap (allowance) for the payment contract.
The smaller of those two values is the amount the aApp considers itself "authorized" to use—it is how much it can theoretically spend on your behalf.
Minimal required authorization
In order to log in, the aApp requires you to have some minimal authorization—currently set at 1 USDC. This protects the aApp from abuse, as it ensures that its users have at least some funds when they attempt to store data on S3.
Maximum overdraft
In addition to your total authorized amount, the aApp keeps track of how much USDC you currently owe it for the S3 storage you have used. It would then slowly withdraw those funds from the USDC you have authorized it to use, whenever the amount owed exceeds some threshold.
However, at some point, you might authorized USDC for the aApp. At this point, the aApp considers you to be in "overdraft" (it can spend no USDC on your behalf, but you still have data stored on the S3 storage).
The aApp will keep overdrafted buckets around for a while (even though they are inaccessible), but once the overdraft hits a maximum threshold—currently set at -10 USDC—the aApp will delete buckets.
Hence, you should maintain some authorized amount at all times.
Attestation
Attesting an aApp allows you to get cryptographic proof linking back to the CPU's manufacturer that attests that the CPU is running a specific piece of code without allowing for any tampering with it. In turn, you can use this proof
How to attest the aApp
Self-attestation
To review the attestation of the S3 aApp, you can use the "View Attestation" link at the bottom of the Apocryph Console. That link will take you to /.well-known/attest/view, a page that will automatically verify the signature of the TEE environment, the deployment that created it, and the TLS certificate used for connecting to it, Apocryph aApp toolkit documentation.
In addition, if you scroll down to the "Certificate Check" part of the attestion page, you can use the Manual Certificate Verification process described there to verify the certificate for yourself.
The same /.well-known/attest/view page exists for the S3 API and the Minio Console—append the path to the correct hostname to see it.
To fully attest the App, make sure to check that the values reported by the Self-attestation page match those in the linked GitHub job.
Exploring the codebase
The S3 aApp attestation just tells you that the application is running a particular version of the S3 aApp codebase. This by itself is meaningless if you cannot preview said codebase.
You can access the whole code in the S3 aApp repository. In particular, the repository includes instructions for running a local instance of the aApp, which should help you understand the code and its moving pieces faster.
A critical piece of the codebase is the application manifest, which describes how the S3 aApp is deployed, including the version of the aApp toolkit used (which is in turn responsible for setting up and securing the disks the S3 aApp uses to store all buckets on).